Working notes for felted slippers with longer ankle section.
Theo wants a pair. He loves the pair I already made him, but would like the next ones to have higher legs section, so his ankles don't get cold.
I'm trialling a pair structured this way and Loz is crash test dummy.
 Made on my midgauge SK860 aka Yoko, using that fabulous Bendigo Rustic 8ply. Which felts like the clappers, as we'd say. However, 8ply Bendi isn't the thickest - even felted, so I thought I'd make them with some padding. And to help me identify which area/s need improvement I did each section in different colours.
inner sole - bluestone
inside ankle - green tweed
outside ankle - damson
heel - green tweed
sole - damsom
toe green tweed
upper - damsom
Well, without any further adooo. Here's what I did.
It is necessary to know how long/wide you are going to make the foot section. The inner sole covers the entire section, from half of the heel and toe. I'm not sure if the the heel side of the short rows and the top of the toes need to be doubled as well or if fully lined would be good.. We shall see.
Make two inner soles:
Cast on 26 sts on WY, with MY, T8, knit one row, set carriage to hold. RC000.
 put centre 8 needles and all 9 needles on the right to hold.
knit one row.
pull out 8 stitches on the left, wrap needle next to the carriage (side)
knit one row and wrap the yarn under innermost needle in hold and working from the centre to the outside, alternative bringing one needle into UWP on the opposite side to the carriage and wrapping under the next needle towards the outside each time, until the end.
In other words, identify the centre panel of needles and each time - wrap the needle on the same side as the carriage and put one needle back into work on the opposite side - each row - but wait, there's more to do..
Side levers go forward. and I left them there for the entire project.
Ev 4th row EON alternating slip stitch is worked.
to do that - leave the carriage in hold and the outside needles don't knit. but with the 1:1 ruler, bring every second needle to Upper Working Position (UWP) and set the carriage to slip. The needles in UWP are knitted, so make sure the first one is next to the new stitch being brought back into work.
Yes I know this is a little bit of work, and I did need to concentrate, but once I got into a rhythm, it went well.
My notes say:
C026 WY, 1 row, working short row from the middle 9/8/9 and EON slip st ev 4th row..
Keeping the EON every 4th row - and I found alternating which needle was slipped gave an evently felted result. (from the experiments I did on the bag a few weeks earlier).
Work K 60 rows then
short rows to 8, take it off and set aside until it's time to graft onto outer sole.
Now onto the ankle part.
I thought doing this in one whole piece was a better option than doing it in two sections. I trialled doing the joining seam in the back and the other one in the front. Loz will tell me which one is better.
Cuff - I'm not going to explain how to do the slip EON alternating needles ev 4th row - see previous instructions.
CO 63 (1 for join) T8 - cuff on WY, change to Col 1, then 1:1 EON slip st ev 4th row 30 rows change col 2.
knit 2 rows, pick up loops from slip st EON and continue on till all rows /loops are worked.
T9 - join together 1 row.
T8 - Divide up 13/5/26/5/14 (= +1 for join) which is for back/sides/front/sides/back
take off 26 = for front in the middle of the work, then the 5 each side onto bobby pins then transfer the 13 and 14 (overlapping the centre stitch for 26 sts getting ready for the heel to be worked. Change to heel colour short row down to 9/8/9 join inner sole on all needles and work short rows out. - joining loops from slip stitches ev 4th row EON.
Change to under sole colour and reset RC AND keep a note of where you are with the every 4th row pick up loops.....
Theses are the things that are going on at the same time:
putting on the loops from the inner sole every 4th row
putting on the side stitches one at a time from the bobbypins (ten times in total)
putting the bar from the inner sole onto the end needle after the side sts only (ten times in total)
NOW pick up those side stitches, on opposite side of the carriage, pick up one of the bobby pins and put it on the last needle AND a side bar from inner sole, but just for these 10 stitches, AND keeping the putting the loops from the inner sole every 4th row (don't forget), for the first 10 rows - opposite ends of the carriage is having side stitches put on from bobby pins, loops are onto the correct needles every 4th, when that's done, continue to RC 60 rows, but don't join to the inner sole - that's done when the top is formed.
Now change to toe colour and work short rows to 8, attach the end of the inner sole, continue graduations back out to 26sts, change to top colour and join to both sole pieces SAYG to end.
Graft (kitchener) to cuff.
Secure and weave in ends.
Felt to desired size.
Stitch and row count may have to be adjusted. Loz will let me know if every second row would be better, whether the back of the heel needs to be double thickness - top of toes? top of foot? too soon to tell.
Theo wants a pair. He loves the pair I already made him, but would like the next ones to have higher legs section, so his ankles don't get cold.
 |
| Theo's beloved slippers - before they were felted |

inner sole - bluestone
inside ankle - green tweed
outside ankle - damson
heel - green tweed
sole - damsom
toe green tweed
upper - damsom
Well, without any further adooo. Here's what I did.
It is necessary to know how long/wide you are going to make the foot section. The inner sole covers the entire section, from half of the heel and toe. I'm not sure if the the heel side of the short rows and the top of the toes need to be doubled as well or if fully lined would be good.. We shall see.
Make two inner soles:
Cast on 26 sts on WY, with MY, T8, knit one row, set carriage to hold. RC000.
 put centre 8 needles and all 9 needles on the right to hold.
knit one row.
pull out 8 stitches on the left, wrap needle next to the carriage (side)
knit one row and wrap the yarn under innermost needle in hold and working from the centre to the outside, alternative bringing one needle into UWP on the opposite side to the carriage and wrapping under the next needle towards the outside each time, until the end.
In other words, identify the centre panel of needles and each time - wrap the needle on the same side as the carriage and put one needle back into work on the opposite side - each row - but wait, there's more to do..
Side levers go forward. and I left them there for the entire project.
Ev 4th row EON alternating slip stitch is worked.
to do that - leave the carriage in hold and the outside needles don't knit. but with the 1:1 ruler, bring every second needle to Upper Working Position (UWP) and set the carriage to slip. The needles in UWP are knitted, so make sure the first one is next to the new stitch being brought back into work.
Yes I know this is a little bit of work, and I did need to concentrate, but once I got into a rhythm, it went well.
My notes say:
C026 WY, 1 row, working short row from the middle 9/8/9 and EON slip st ev 4th row..
Keeping the EON every 4th row - and I found alternating which needle was slipped gave an evently felted result. (from the experiments I did on the bag a few weeks earlier).
Work K 60 rows then
short rows to 8, take it off and set aside until it's time to graft onto outer sole.
Now onto the ankle part.
I thought doing this in one whole piece was a better option than doing it in two sections. I trialled doing the joining seam in the back and the other one in the front. Loz will tell me which one is better.
 |
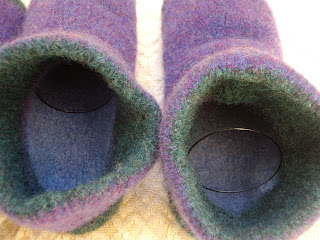
| Inside and outside pre felted shown |
Cuff - I'm not going to explain how to do the slip EON alternating needles ev 4th row - see previous instructions.
CO 63 (1 for join) T8 - cuff on WY, change to Col 1, then 1:1 EON slip st ev 4th row 30 rows change col 2.
knit 2 rows, pick up loops from slip st EON and continue on till all rows /loops are worked.
T9 - join together 1 row.
T8 - Divide up 13/5/26/5/14 (= +1 for join) which is for back/sides/front/sides/back
take off 26 = for front in the middle of the work, then the 5 each side onto bobby pins then transfer the 13 and 14 (overlapping the centre stitch for 26 sts getting ready for the heel to be worked. Change to heel colour short row down to 9/8/9 join inner sole on all needles and work short rows out. - joining loops from slip stitches ev 4th row EON.
Change to under sole colour and reset RC AND keep a note of where you are with the every 4th row pick up loops.....
Theses are the things that are going on at the same time:
putting on the loops from the inner sole every 4th row
putting on the side stitches one at a time from the bobbypins (ten times in total)
putting the bar from the inner sole onto the end needle after the side sts only (ten times in total)
NOW pick up those side stitches, on opposite side of the carriage, pick up one of the bobby pins and put it on the last needle AND a side bar from inner sole, but just for these 10 stitches, AND keeping the putting the loops from the inner sole every 4th row (don't forget), for the first 10 rows - opposite ends of the carriage is having side stitches put on from bobby pins, loops are onto the correct needles every 4th, when that's done, continue to RC 60 rows, but don't join to the inner sole - that's done when the top is formed.
Now change to toe colour and work short rows to 8, attach the end of the inner sole, continue graduations back out to 26sts, change to top colour and join to both sole pieces SAYG to end.
Graft (kitchener) to cuff.
Secure and weave in ends.
Felt to desired size.
Stitch and row count may have to be adjusted. Loz will let me know if every second row would be better, whether the back of the heel needs to be double thickness - top of toes? top of foot? too soon to tell.