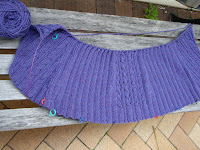
I liked the jacket, but I wanted longer sleeves with close fitting cuff and a different finish on the fronts. Here's my mods:
5.50mm needles gave me the correct width but not row tension, 23 rows not 26, which meant I didn't have to do any mods to the body to lengthen it. The sleeves I made to my length, but the sleeve cap and armhole depth on the body needed to be shortened.
The sleeves:
Cast on 54. I reversed set up row for knitting in the round.
Begin K2, p2 K4, place marker then as reversed to next place marker, then k4, p2, k2. Increases every 6 rows (I have long arms) every 4 or 5 would be quite OK too.
Changed the sleeve cap to no repeats of the 4 row shaping, reducing the height of the cap.
The body:

Cast on 268 = 272 less 1 stitch on each of the sides so that K4, P2 rib was continuous.
Reversed the setup row so it starts on the right side. Worked the body piece, as written, up to the armhole.
The back from the armhole divide:
decreased as written, but continued to 54 rows from commencement of armhole, then did short rows for the shoulders (4 rows).
Shoulder seam:
3 needle cast off.
Fronts from armhole divide:
I'll deal with the collar and neck shaping first:
starting with the 3 stitch knitted edge:
do the collar increases from there so that **2 STITCHES travels into the body from the edge and ++1 STITCH forms the edge of the collar

NECK SHAPING: on the **2 STITCHES: do the k2 tog or ssk on the inside stitch. EVERY 2ND ROW. There will be a couple of rows when near to the shoulders with NO NECK SHAPING, which finishes on the MIDDLE K2 between the cables (ie there will be 2 cable panels to continue working on and 2 cable panels decreased by neck and collar shaping). Continue decreases on the k2 travelling to the side/shoulder seam. Finishing up on the same row count from the armhole; the 22 shoulder stitches and the 15 collar stitches.
Collar: starts on the ++1 stitch edge:
the edge is always k1 RS, P1 WS
there is always a p2 (RS) next to the K2 travelling rib so it can fold over.
These four stitches stay together (place a marker if preferred).
Therefore the increase (make one) is every right side row; on the edge side the marker; beginning with p1; until the collar 13 stitches or the width preferred, so on the right side you will have K1, p2, k2, p2, k2, and so on finishing with the p2, **k2 (that travels inwards, by the inside stitch knitting over the existing 2 cable panels and finishes on the middle k2.)

Shaping From the Inside marker:
The travelling ribs and cable panel will now appear to CHANGE DIRECTION:
Up till now the inside marker has travelled up the garment, maintaining the 4,2 rib.
There should be a K2 rib at the beginning of the cables on the edge side of the marker.
(whichever side it will be a k2, p2, k4, ...to edge) DO NOT DO this decrease ON THIS ROW ONLY. leave the K2 in place. Move the marker if you like to the other side of the K2.
From here on do a K2tog or ssk to keep this K2 travelling up to the shoulder.
YES there is ALSO a travelling K2 doing neck shaping.

Collar continues
do the 3 needle cast off for the shoulder seams.
continue with the collar knitting the last stitch of the collar with the next stitch on the back live stitches, ie finish with p2, start with k2tog, to middle.
do 3 needle cast off to join the collar.
Finished 27 October 2008
2 comments:
Wow, excellent detail on the mods, thanks!
Out of curiosity, does the collar stay folded down? I made a shallow shawl collar on a different sweater and it never stays put!
Thank you.
I made the collar to either fold down or flip back flat.
If you want your collar to stay folded, do a tack stitch thingy to the shoulder seam and collar - stitch a line of threads about 0.5 to 1cm (1/2" ish) then do blanket stitch on the strands, which should allows the collar to move a little bit but not flip up but not pull either.
Post a Comment