Wednesday, January 26, 2011

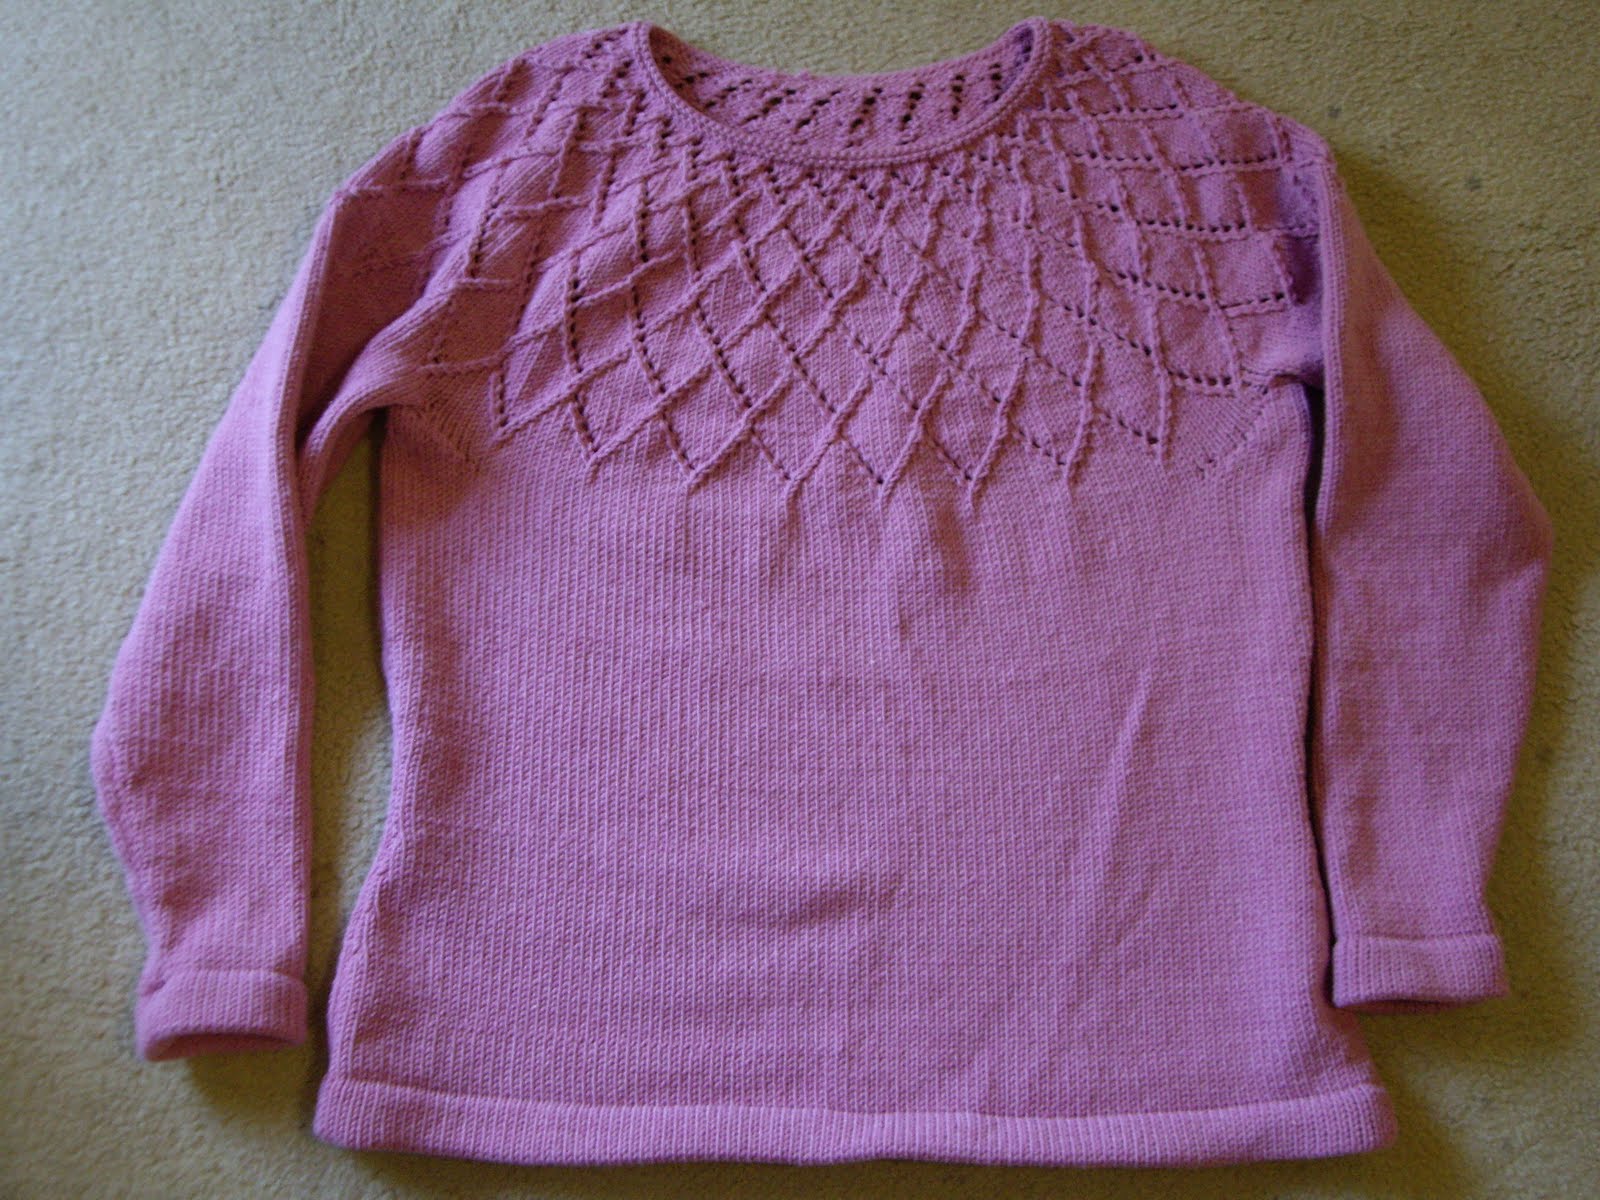
Finished my Spiral Jumper

I've finished it and here it is. Phyllo Yoke Sweater from the Knitting Nature book.


It worked out very well. The only odd thing was the chart instructions. Of course every second round is knitted, but nowhere did it actually say to do that. Plenty of blather about seashells. I think less seashells and more attention to correctly writing out the instructions would be better all round. Never mind, here is a closer look as the yoke:

I like how the KX350, with the wobbly tension mast, makes the stocking stitch sections a little bit uneven, just enough to add a nice look to it. Very pleased. I'm sure when the weather cools down it will be my fav jumper.

Monday, January 17, 2011

A Book, a Bag, a Machine and an Afternoon

This is what an afternoon spent knitting at a machine looks like. The book "Knitting Nature", which has the Phyllo Yoked Jumper I'm making, an empty bag of Paton's Washed Haze, a Brother KX350 and an afternoon of getting stuck into it. Working on projects is not a pretty activity, there's mess - tools, workbook, cleaning cloth, weights, end of balls dangling, empty ball bands, waste yarn strewn where it landed. So here is a photo of the end of the day's work. It's not a pretty picture, but I decided work never is.

By the time I got to the 14th ball, I had made the front, back and sleeves, all up to the armhole ready for me to hand knit the yoke.

I changed the pattern a little bit, I did a rolled hem, first one ever, put in a couple of stitches waist shaping and short rows not 2tog on the neckline.

T6 gave 19S/26R = 10cm, which closely matches 4.5mm wood knitpics circs.

Now it's on it's way, I'm up to the first row of the chart.

....And I have tidied up! I've finished the projects I'd lined up for the KX350.

Friday, December 17, 2010

No Boring Bits Machine and Hand Knit Projects


I'm interested in putting some hand knit panels onto the machine and getting the machine to do the boring bits.


I know there are many ways to do this already. Tried and true, but I thought I'd like to see which one I liked best.


The most obvious one is to sew the pieces together with mattress stitch, but I didn't want to do that, mostly because I thought it would pull in an unpleasant way along the bustline.


Firstly, daughter decided to try our hand at a Drops dress/tunic pattern and I decided to do Climbing Vines, both have a varying stitch count over a number of rows and is too much of a pain to do on the machine.


On this one, daughter hand knitted the bands on the train to and from work, and joined the "bar" up on the KX350 Brother machine. As best described in Diana Sullivan's single bed sock tutorial. However, this is excellent for thinner sock wool, on this 8ply yarn, it's not quite so good.


Next bright idea we had was to pick up the "bump" not the "bar". As Best described as being the bit between the bar, very each to pick up on thick work.


This brings me to my second project that I've been trying to figure out the best way of making, the Climbing Vines Jumper.


So I decided to knit up the leaf panel on 4.00mm needles, but first I did the ribbing on the Passap, cause it's quick and easy. Then onto the plastic KX350:

Here is a pretty clear shot of the "bump" that we decided may give a tighter "seam"

I used the single prong to get the stitch and put it back onto the machine.

And put it onto the needle, which is done every second row and really worked well.


Sunday, December 5, 2010

I've made some Shawls

It's been a bit longer than I thought, since I blogged. Daughter moved in for a few weeks, which of course turned into about a month longer. We've been stuffed into a 2 bed apartment, my son, my cat and my darling daughter had a bed in the dining room where I had my machines set up, so they got squashed into the only spare space left. Daughter is more important than machines! Time to do some handknitting - with beads. Why not?

Anyways, she has left this morning, visiting friends, then staying with her Dad until she leaves for the UK to spend Christmas with her new soon to be inlaws.

I've made her a shawl from some gorgeous silk I bought from the Bendigo Wool and Sheep Show in July, direct from the Moseley Park stand - Moseley Park 100% silk laceweight in Ice Glow.


Loz chose Haruni and I bought the silver lined silver beads from Empire Beads, the 3mm (8/0) and 4.5mm (5).

Then I decided to make up my silk/merino I won as a monthly prize from theknittery, when Daphne was in Victoria, she's now in the US and not dyeing. Such a shame, I loved her work.

So, while I was looking at shawls I came across Frozen Leaves and decided it would be perfect. I ordered the beads for both and here is mine:


This month, I hopefully will be machining again.

Sunday, October 3, 2010

Machined Shawl Collared Cardigan


The original Shawl Collared Cardigan appears in Jo Sharp's Knit Issue 1, which has no machine instructions. I have deviated from the written instructions, stitch count, bands and collar shaping. If anything isn't clear, please obtain your own copy of the book and go from there.

Knit on SK860 midgauge + ribber.
5 x 200G Bendigo Woollen Mills 8ply Highlands in Cinder.
T5 swatch = 22st/28r = 10cm

All bands start with 3 sts on each end, then 11.11 each bed, HP, weight the end stitches to start with, I used a bulldog clip onto the end of a double ended latch tool that came with the machine.

Back
Bands: T2.2/2.2 MB+R; L65..R65 in 2.2 IR rib.
I use long tail cast on and transferred the stitches onto the needles. you need +200 if you do this way, I left the extra dangling until I hung the combs.
work 20R
Body: Transfer all the RB sts to the MB, the 2 group onto the empty needle. (13o sts) reset RC000.
put waist shaping in if you want, but otherwise ->120R reset RC.
Armhole: -6 ev row twice - I thread onto a little piece of scrap. Then -1 (3rd needle onto second, move both in one st) both ends ev alt row 15 times (88st), work to 62R.
Shoulder: set carriages for short row shaping. Reset Russell levers to | both sides.
bring 3 needles on left to D, knit one row, bring 4th needle to D, (4 needles now out of work),
bring 3 needles on right to D, milk the yarn to ensure tight wrap. knit one row, bring 4th needle to D, continue these two actions 4 more times till you have 44 sts COR.
next row is tricky, bring out your 4th needle, STOP, this is the tricky bit don't knit yet, milk the yarn, as you move SLOWLY to take up the wrap BUT YOU MUST NOT LET THE LEFT EDGE OF YOUR CARRIAGE go past your left side wraps, you have to STOP TO DO RESET:
before the edge of the carriage reaches your wrapped stitches, you do reset your Russell lever LEFT SIDE ONLY to ||, this will take up all your stitches on the left, knit to the end of the row, reset right Russell lever to || knit off your final row.
take off all sts however you prefer, mine go onto the circs I keep for this.

Fronts - make two, reversing the shaping on the other one.
L23/R23 work Same as back, with shaping on one side only.
Note: there is no neck shaping.

Sleeves - make two
L23/R23 work bands same as body. RC000
T5 +1 by moving last sts onto next empty needle, pick up the stitch bar under 2nd needle and place on empty needle, both ends every 4th row to 96 sts (RC100)
work to 120RC. reset RC.
Sleeve cap: -6 next (onto scrap), then as before, 3rd onto 2nd and move both in one needle, -1 each end 18 times (RC38), then ev row 15 times to 12 sts and take them off to cast off or cast off around the posts, whichever you prefer.

Bands
T2.2/2.2 MB/RB L16/R16 2.2 IR rib, work to 140 RC, then + 1 ev 6 rows ALL SHAPING IS ON THIS SIDE, then at RC212 or 72 if you did a reset, place a marker, a paper clip, small piece of scrap yarn whatever you choose, this is your shoulder seam and it makes it easier to sew it up - just saying. I put short rows in here, it sits so much better with them.
**Reset RC000 and BOTH carriages to | (all four russell levers) knit one row. COL.
on RIGHT side, pull the (MB) 1x2, 3x2 and (RB) 3x2 needles to D, knit one row
pull out one needle from MB, milk yarn and knit one row.
pull out 3x2 + 3x2 (but one will already be out on the MB- the wrapped stitch), milk, knit.
repeat last 2 rows,** reset ALL Russell levers to || knit to RC36
repeat ** to **
reverse the short rows, wrapping as you go bring needles to B, set side levers to collect them.
knit to RC78 repeat from ** to ** Reset RC000.
-1st ev 6th row to original stitch count = 72RC. reset RC and knit another 140 rows.

Finishing
do 3 needle cast/bind off on shoulders, align your collar with the shoulder seam and join whichever way you like. set in sleeves with linker, machine or darning needle, finish side seams and weave in ends. As you can see, I had help with this.

Sunday, September 26, 2010

Making a Vest


Theo and Anth took me to Bendigo in July. On the way we stopped at Wangaratta mill shop and Theo bought some 3ply blue wool. Then I said I'd make him a vest. He likes the Passap and the Passap likes 3ply - all good.

All was well for the body and I decided to do the armhole and neck ribbing on the Passap, put it on waste yarn and sew/graft/kitchener it on. Well that was a dismal failure. It looked really awful, so in the end I took up the knitpicks 2.25s and did them by hand. Much better.


Sunday, September 5, 2010

Neverending Big Vest on SK860 Mid Gauge

I decided to make a vest in July, to wear to the Bendigo Show. A plain simple vest. Right. Finished it this week.

I'm still learning how to use the mid gauge and decided to do the cast on for the 2:2 IR rib in the book. I tried many times before realising that I was doing it right - but it looked awful because it was awful. I tried to adapt the Passap cast on.. nope didn't work either. In the end I used the Knitted back e wrap cast on (Ch2.5 in Susan Guagliumi's HMS4MKers) that works so well for single bed Passap work. I put three extra to move back a needle to keep it even: I started out with 7 sts, used the double eyelet to transfer 2 sts to the ribber, moved 3 over one needle, cast on 4 more and so on until I had it all done. While it worked I'm still looking for a "perfect" cast on for 2:2 IR on the middi, going to do a crochet cast on next.

I had 3 x 200G Bendigo Woollen Mills 8ply Bramble Allegro
and 1 x 200G BMW 8ply Dark Plum 8ply Classic

Now onto the back:
Cast on 2:2 IR, 65L to 65R, T2.2 both beds; knit 20 rows.
On the ribber: leave the 10 centre ones, and transfer all the others into the single needle space on the main bed.
T5 MB and T2.2 Ribber. RC000, knit 120 rows
Armhole: RC 000
-10 next two rows
-1 ev 2rows 9 times
straight to 72 RC
Shape Shoulder:
-8 next 4 rows. (I did short rows, then one more to seal it off)
take off however you like, I put onto circ needles.

Fronts:
Cast on 47 (counting on the main bed, the ribber stitches count as one.
T2.2, knit 20 rows.
transfer all stitches to main bed but keep the ribber up and use the ribber arm
- otherwise... you guessed it... you make it and the tension is different.. so you have to make it again to match the back - and that was just ONE of the many, many undos I did, just warning ya!
T5, ribber up but no stitches, knit 120 rows. RC000
-10
-1 ev alt row 9 times
straight to 72
-8 (Armhole edge) ev 2nd row twice.
make another one with reverse shaping.
Now wasn't that easy? I thought so.

Band
This is where I really, really came unstuck. I didn't buy enough wool and I couldn't for the life of me work out where to get a magic ball (for the non Aussies, one of our famous painters, Norman Lindsay, wrote and illustrated a book called the Magic Pudding, about a pudding that never ran out. A classic children's book here).

Now back to the band... for reasons known to noone I wanted a wide band. And have enough left over for a small sleeve cap.. I really liked the Kaino vest and had this in mind.

Things I tried that didn't work: Do it on the passap with the two colour changer with two rows each of dark plum and bramble. Ran out of wool. Made it thinner, only 5o rows to go.. Ran out of wool. Remade it on the Passap with 6 rows of dark plum across the back of the neck - nope still ran out. Went back to the vest. Did it really have to be that long? OK I could do with 30 rows less. Undid everything. Remade it all with 120 rows.... sigh... Will this vest ever get made?

Back to the band:
Let's pretend I bought enough to do the whole thing in one colour:
Cast on ... heavens I didn't write down the numbers properly, but
11 groups of 2 on the main bed and 10 on the ribber would be good. Take a look on your back and decide if you want it that wide or wider. anyway, here's the numbers:
T2.2
Knit to 140 rows, RC000
+ 1 st every 4 rows (however you like) 18 times (RC64),
knit straight to RC 76 PUT IN A MARKER on the neck edge (where the increases are). RC000
straight to 74 RC. PUT IN A MARKER on the neck edge. RCOOO
knit straight to 12RC
- 1 st every 4 rows (however you like, but looks good if you match the increases). RC76. Reset RC000
work straight to 170 rows.

Of course... I couldn't do that, could I?

so ... one of the Ravelry girls did and excellent job making socks on her single bed, I was very impressed with the clean line she got on the join. After "freeing up" the wool from 3o rows front and back. I felt I was onto something.

So... I made an outer Dark Plum strip, with about 10 rows too many in case I mucked up the maths, with a 7:7 count on the 2:2 rib, but put 3 on each end. one for the roll on the font edge and one on the other side for the join (I did a practice piece to work this out too... I did say this vest took six weeks to make, didn't I?)
then made a shaped strip 7:7 wide, again with the 3 sts (on the main bed) on the edge. Now there isn't a lot of room, so I ran a contrast thread for about 30 or so times (60 rows) so I could pick up that bar on the edge easily. The bar is slipped over the last needle every second row, which was easy to see which one while the cast on bar was in the way, I didn't worry about picking up the cast on row, I started with the first bar and pulled out the marking thread as I went. Yes it did take a bit more time, but I did it all in an afternoon and would certainly use this method again, I thought it was an excellent backup for adding a vertical stripe.

Now onto the Sleeve Cap:
join your shoulder seam however you like. I do the 3 needle cast/bind off.
Then I picked up every row, not the 3 of 4 that is usually done, with the Dark Plum and knitted in the pick up row on 3.25 circs (168 sts), then hung them in 2:2.
Start the short rows immediately. (yep, I did they twice to figure this out too). SET both carriages to short row.
(BUT IF I MADE THIS AGAIN I'd start in the middle and work my way outwards).
Easiest way to explain is - do you counting on the ribber:
on the left side, pull the needles up to the 7th group of 2.
knit 1 row, hang a claw weight,
pull up the NEXT needle on the main bed and pull up the same number on the opposite side,
knit 1 row, hang claw weight,
pull up the NEXT needle on the main bed and pull up 3 on the opposite side,
knit 1 row, continue, pulling up 1 on the carriage side and 3 on the opposite until 11 (eleven) groups of 11 (two) have been short rows (row 18)
ROW 19:
watch what you are doing: slowly start to knit, and when you see the LEFT HAND edge of the carriages clear the stitches on hold and are on the bit that hasn't been short rowed, THEN on the LEFT HAND SIDE flip your russell levers to pick up the short rows. BUT if you don't watch what's happening, you can miss collecting them (yep just one of the many redos on this vest).
ROW 20: flip the russell levers on the right side and knit all stitches.
work straight to RC24, change colour to main and knit 6 more rows.
Cast off however you prefer.

Do the other one.

Things I'd do differently on the next one:
buy enough wool.
the front band thinner - make it the same width as the back
on the shoulder do -5, -5 -5 and add two more rows each side on the bands.
Start the short rows on the sleeve caps in the middle, that would be better.

That's it.
My Neverending Big Vest.